Dental Cleaning Orthodontics Tips For Dental Hygienist


Do you absolutely dread cleaning patients with braces? These dental hygienist tips and tricks will help you feel less defeated when you’ve got orthodontic patients coming in right before your lunch break or at the end of the day.
Are these patients more tedious to clean? Yes. But these hygiene hacks can help you speed your routine along without compromising the level of care you’re providing. Because really, of all of your recall patients, the ones that are in braces need as thorough of a prophylaxis as possible. Whether you’re a dentist, orthodontist, dental hygienist, or patient, cleaning around braces is always a hassle.
An Orthodontist, Dental Hygienist’s Goal
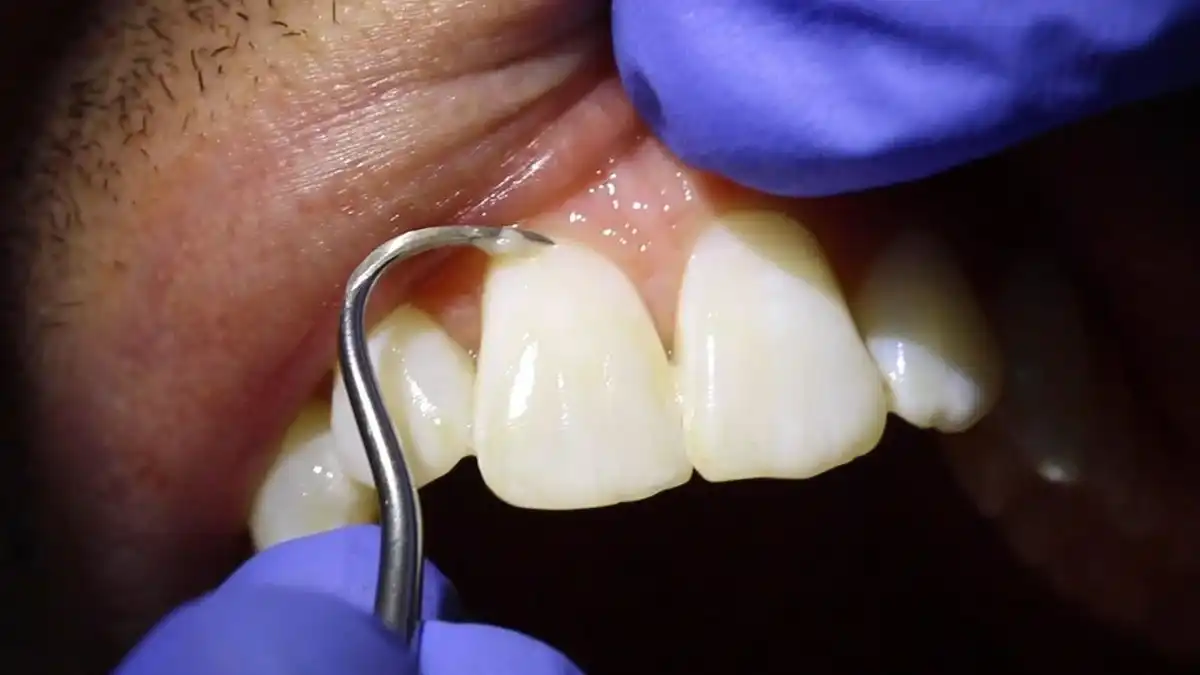
One of the biggest hurdles with orthodontia is helping patients keep their teeth as clean as possible. When the excess buildup isn’t removed thoroughly or frequently, it can lead to unsightly demineralization around fixed appliances. Whenever you’re cleaning patients with braces, you don’t want to skip over these spaces. Even though they’re physically more challenging to reach with a scaler, there are still effective and efficient ways to clean them thoroughly.
These dental hygienist tips and tricks will make your next ortho prophy feel more routine and less overwhelming. And chances are, even though you might feel like you’re poking and prodding a little more than usual, it’s probably still easier on your patient than what they’re used to at the orthodontist’s office every month.
Tips for Ortho Hygiene Appointments
Have Your Patient Pre-Rinse
I always have my orthodontic hygiene patients pre-rinse before their prophy. Even though a pre-rinse isn’t technically required, it helps to flush away any surface debris like breakfast stuck between their brackets, lunch underneath their wires, or leftover popcorn from the night before. Get them to rinse fairly vigorously right when they come in and before you do anything else.
Tackle the Facials First
Here’s where you have to play a mental game of not feeling defeated before you even start. Although you could start with scaling the lingual surfaces first, I prefer to tackle the facial areas since they’re most difficult, that way you’re on the home stretch once those areas are complete.
For scaling around braces, I highly recommend using an ultrasonic. Use your instrument to clean above all of the brackets, below the brackets along the gumline, and then the interproximal surfaces next to the fixed brackets. An ultrasonic can clean around anything, so it’s a must-have when your patient is wearing braces.
Scale the Linguals and Interproximals Like Normal
Next, clean all of the other tooth surfaces like a normal cleaning. You can continue to use your ultrasonic if you prefer, or switch to a hand scaler if you like. I prefer to hand scale the anteriors, then take a universal scaler to clean all of the posteriors and interproximals, both from the lingual and buccal.
While you’re at it, don’t forget the occlusal surfaces. In addition to polishing them, feel free to clean out any stain with your ultrasonic or hand scaler.
Air, Air, and More Air
Mild calculus tends to blend right in with tooth enamel when it’s saturated with saliva. You’ll want to go through with your air/water syringe to dry all of the surfaces around their brackets and gumlines to double-check that you didn’t miss anything. If you did, simply go back and scale it, then re-check the area again.
Your air/water syringe also acts as a nice little add-on at the beginning of the appointment, if your patient still has food or other debris between their brackets after their pre-rinse.
Use a Prophy Brush or Air Polisher
Polishing around fixed orthodontic appliances is usually best with a prophy brush instead of a traditional prophy cup. Walk the polishing brush along the brackets to clean above and below each one, as well as the interproximal areas. Prophy brushes also work well for cleaning the occlusal surfaces. I recommend switching back to a traditional rubber cup to polish the linguals.
If your office has an air polisher and you’re comfortable using it on young patients, this is a great substitute for traditional prophy angles. Air polishing can get a little messy, but it’s super effective at removing stains in hard-to-reach areas like around braces.
Tie a Knot in Your Floss
Yes, you still need to floss between each of your patient's teeth! To prevent your floss from slipping off of the floss threader, tie a knot on it. It sounds simple, but it’s a game-changer with all of the weaving in and out that you’ll be doing.
Finish Up With Fluoride
It’s always a smart idea to apply topical fluoride after your orthodontic hygiene patients. Especially if they’re already starting to show signs of enamel demineralization along the gumlines or around the brackets. If your patient doesn’t have insurance or they’re “too old” for their insurance policy to cover their fluoride treatment, be sure to discuss the advantage and affordability, which make the modest investment well worth it. When their parent/caregiver understands the physical and aesthetic need for fluoride during orthodontic treatment, they’ll probably be more willing to pay for it out of pocket. Try not to let their insurance coverage dictate the quality of care that you provide!
Don’t Forget Oral Hygiene Education
Make a mental note of where buildup was heaviest in your patient’s mouth. Do they need to adjust their brushing angle, possibly switch to an electric brush, or invest in a water flosser? Talk to your patient about their hygiene habits and how they relate to what you saw during their cleaning. If you want, you might even use disclosing agents before you start scaling, so that they can see the buildup more easily than just taking your word that it’s there.
Adjust Their Recare Schedule if Needed
If you have ortho patients who have especially heavy buildup, gingival inflammation, or bleeding, consider bumping them up from a normal six-month recall. Ask for them to come back in 3 or 4 months instead. Clean and re-assess their situation at that point, and continue to monitor their oral health. After their braces are removed and they’re in a retainer, they can usually go back to a traditional six-month recare schedule.
Recap
Cleaning patients’ teeth with braces is a little tedious, but it’s not impossible. Incorporating these dental hygienist tips and tricks will make your ortho recalls easier and help your patients better care for their mouths between checkups. Stay on schedule by tackling the facial surfaces first, using an ultrasonic to clean around fixed brackets and underneath archwires. Then you can easily go back and scale the lingual and interproximal areas with a hand scaler if you want.
From there, polish all of the surfaces with your prophy brush (or cup) or an air polisher if you have one, then floss between each of the teeth. And don’t forget the fluoride to remineralize any surfaces that had heavy plaque buildup. But last but not least, don’t be afraid of breaking out of the traditional 6-month schedule if you have ortho patients who have a lot more buildup than normal. It will help them prevent disease but it will also make your job easier the next time they’re in for a cleaning!


Make your inbox smile!
Subscribe